Skip to content

Installing a WordPress Multisite language switcher, WooCommerce-ready and all, is easier than you’d think when you use the right plugins.
You can get set up quickly to let your network of online stores give your customers the choice to swiftly change the language your site is in with one click.
Here’s how to do just that with the Weglot and Multisite Language Switcher plugins. I’ll also share more details on front end and back end language switching in your WooCommerce Multisite network.
Multiste, Language Switcher, WooCommerce, Oh My!
Adding a language switcher to your WooCommerce Multisite network improves existing and future customers’ ability to understand your website, your company and its policies.
Not everyone’s native language is English, even if they’re in a majority English-speaking country. That’s why adding a language switcher to your site or network can help improve realized sales and reduce abandoned carts.
You’ll also be in a much better position to reach new audiences, especially internationally, offering opportunities for growth and sales.
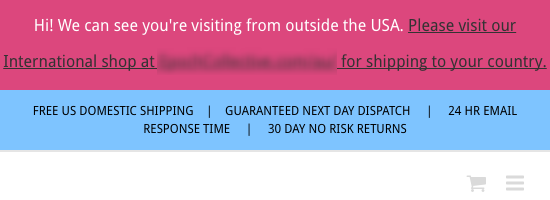
An example of a language switcher can be found on Weglot’s website. Even though the language switcher there is a drop down box, it doesn’t have to be. But, this is an example of what you can build with the steps detailed below.

With translations available in the back end, you’ll improve users’ capabilities for those who are not English-native speakers.
It may also be important to note that search engine-optimized translations help improve search engine rankings.
How to Set up a Multisite Language Switcher – WooCommerce Included
Before digging right into adding a language switcher to your WooCommerce Multisite network, it’s essential to do some basic housekeeping.
Be sure to update all plugins, themes as well as the WordPress core. This helps prevent compatibility issues. Then, back up your entire Multisite network before continuing.
Whenever possible, use a staging or local development environment for testing to help prevent any downtime or issues with customers’ shopping experiences.
Weglot also has specific requirements you need to be sure to meet:
- WordPress 4.5 or greater
- PHP version 5.6 or greater
- Rewrite rules activated
1. Setting up Front-End Translations
Start by installing and activating the Weglot plugin. Then, create an account on Weglot.com. Once that’s all done, you’ll be redirected to your account page where you’ll see an API key listed.
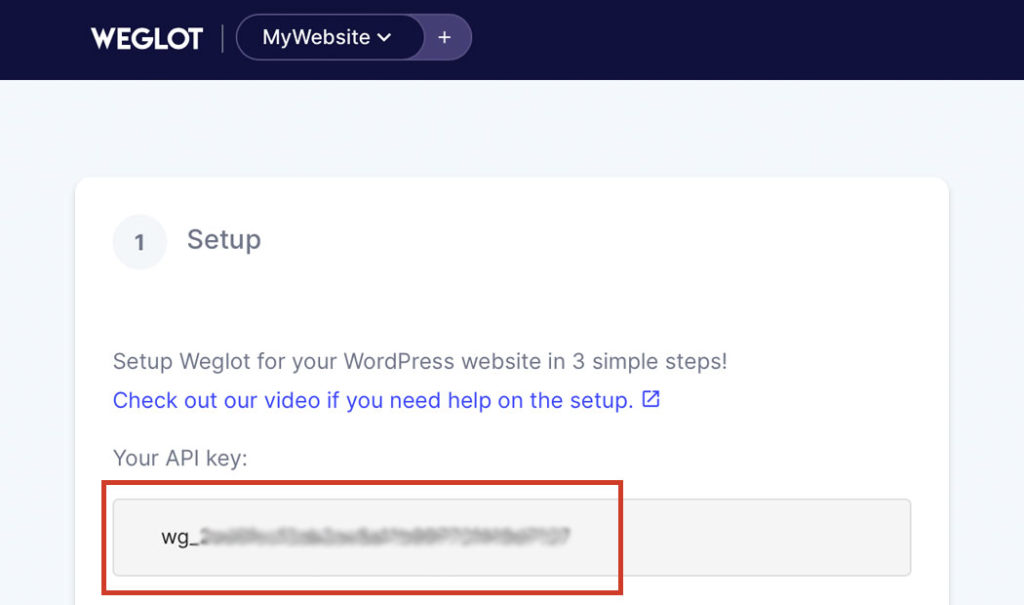
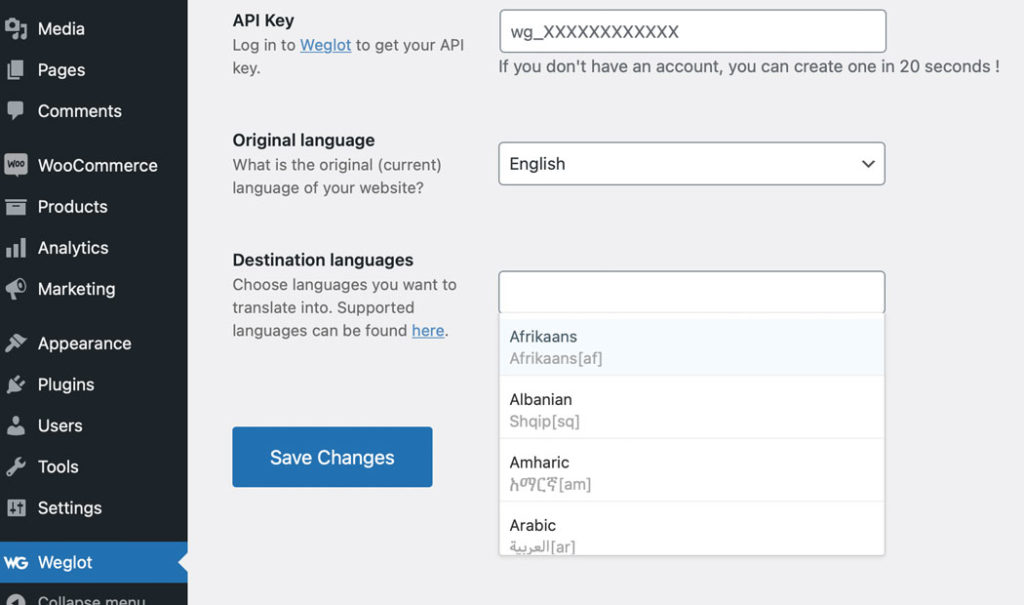
Copy the API key, then head back to your WooCommerce Multisite network. Find Weglot in the menu in the admin dashboard of the subsite where you want to add the language switcher.
Paste your API key and select the default language of your site in the Original language field. Then, click the drop down box underneath and select the languages you want to make available to your users.
Choose the ones that make the most sense for your store. For truly global stores, offer all languages as the translations are automatic. Otherwise, select the languages that serve your target audience or the specific markets you want to reach. Automatic translations can be modified in your Weglot account.
When you’re done, click the Save Changes button. Now, you can go to the front page of your subsite and see the language switcher in the footer.

Next up is going to the admin dashboard of each of the sites within the network where you want a language switcher. Go to Weglot in the menu and enter in the same API key. Repeat the rest of the setup process above.
2. Setting up Back End Translations
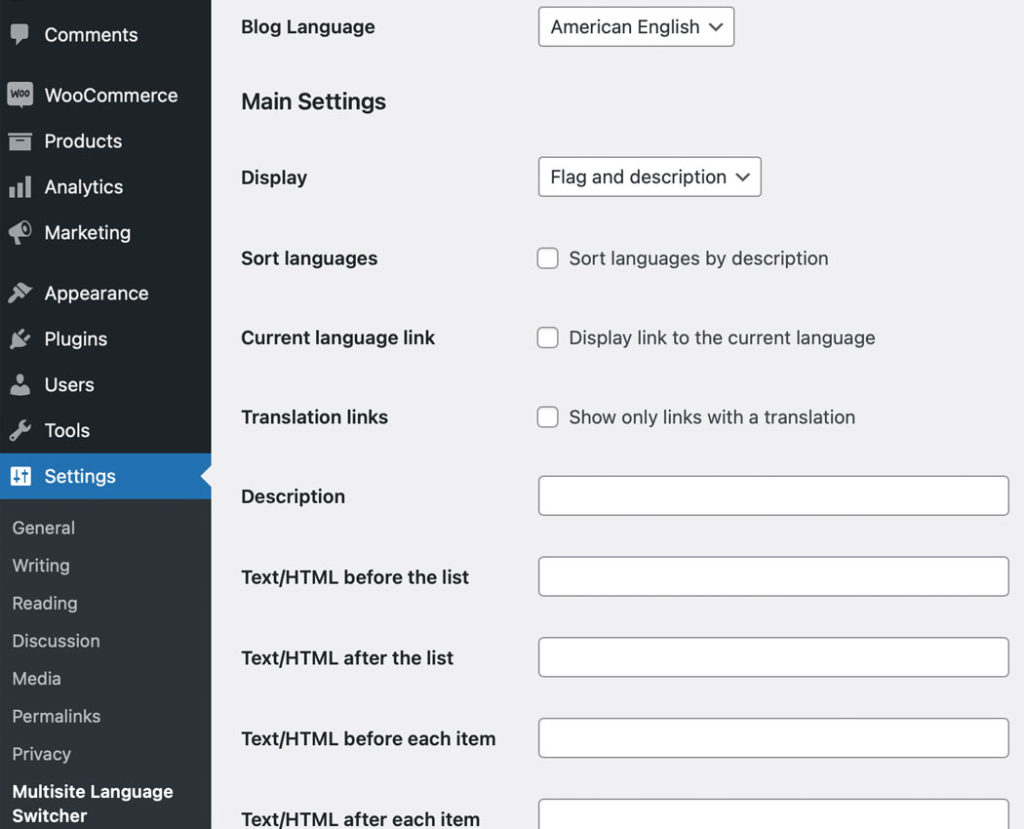
To add a language switcher to the back end of your WooCommerce Multisite network, start by installing and activating the Multisite Language Switcher plugin.
Choose the languages you want to use and configure the options by going to Settings > Multisite Language Switcher.
Adding Other Back End Translations
When you’re done, save your changes. Then, you need to add the appropriate language files to your network manually. To do this, visit the Translations page of the WordPress Translator Handbook.
Click on a language on the list that you want to add and scroll down to the bottom of the page.
Select Machine Object Message Catalog (.mo) from the second drop down box. Then, click the Export link to the left. Save the file to your computer.
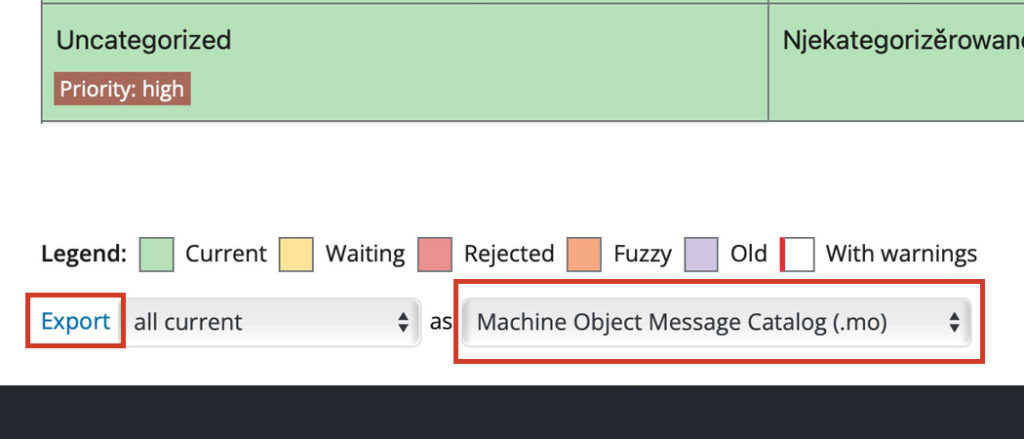
Download each of the languages you’d like to include on your site.
Access your site’s files through SFTP to upload the MO files to the /wp-content/languages/ folder. If you don’t see one, create it.
Now you’ll be able to go back to the back end and access the translations you created.
Afterwards, repeat these steps for each of the sites in your network where you want to offer backend translations.
Increase International Sales with a Currency Converter
By now, you have a language switcher set up on your WooCommerce Multisite network. If you’d also like to go a step further to boost the user experience and your sales, you can add a currency converter in a similar way.
For details, check out WooCommerce Multi-Currency: How to Add Currencies (to Multisite).
3. Test and Launch
Once you’re satisfied that all settings are working, create another full back up of your entire network. That way, you don’t lose your progress in case things go awry as you finish up. If they do, you’ll be able to restore your site and keep your changed.
When you’re done, push the new features to your production site. Keep in mind that depending on your staging or local environment, the steps to do this are different. So, be sure to check out the documentation pages you need if you’re not sure how to do this on your own.
Make it Even Easier: Hire Verified WooCommerce Experts
If you’re not keen on the DIY route, you need a custom solution or you want a pain-free setup experience, you can hire verified WooCommerce experts like us to take care of it for you.
We’ve previously built a custom solution that included:
- List of countries that displays across all sites in the network
- A currency converter
- Geolocation on first site load
- Based on enabled country, users are redirected to a different site
- Once language is selected, corresponding site and currency loads
- Additional selections automatically added to the cookie
When a user selects languages, they don’t need to select it again if they come back to the site after leaving.
Whatever you need, we can help. Feel free to get in touch with us to see how we can specifically help you with your WooCommerce Multisite network based on your needs.
In Conclusion
In a few minutes, you can set up your own Multisite language switcher, WooCommerce-enabled and all with a plugin. Or, you can choose to go with a developer that can create a custom-fit solution for you.
Were you surprised at how easy it is to include a Multisite language switcher for Woocommerce? Did you have difficulties in the process? Feel free to ask your questions and share your experience in the comments below.