Adding a WooCommerce Multisite new user role means your network of connected online stores can have custom account capabilities. You can create them for specific groups of users that you set.
Not everyone should have access to all the available capabilities because they include editing privileges which not everyone needs. Limiting capabilities by creating custom user roles helps increase the security of your WooCommerce Multisite network.
For example, if you have different team members like managers, assistant managers, marketing leads, or other roles, then adding a new user role ensures they have access to only what’s needed.
Editing user roles also helps if an existing one just needs some pruning of unneeded functionality for the users that need it.
Here’s how to create a WooCommerce Multisite new user role with a plugin or code as well as how to edit user roles in your network of online WordPress stores.
How Does Multisite Handle User Registrations?
When you create a WordPress Multisite network, you can enable user and site registrations in the network’s settings. This means you can optionally let visitors create an account so they can publish comments on one of the sites in the network, for example, or you can let them register to the site itself.
By default, a WordPress Multisite network with site registrations enabled will have users sign up to the network. If you want users to be able to register for individual subsites within your network, then that takes some extra configuration such as with a plugin.
For details, check out WordPress Multisite and WooCommerce Multisite: An Overview and Adding a WordPress Multisite User Sync Feature (with WooCommerce).
WordPress Multisite’s Default User Roles
When registrations are enabled, users get assigned a specific user role that has specific capabilities attached to them. By default, it’s the “subscriber” role where users can peruse your site and leave comments. They don’t have any kind of administrative privileges.
Here are the user roles available out of the box that you can manually assign to accounts:
- Subscriber – This default role for registrations lets users read published content and submit comments when this option is enabled. They can also update their profile.
- Contributor – This kind of user can manage their own blog posts.
- Author – Users with this role can add, delete and edit their own blog posts as well as upload files.
- Editor – This account can create and edit their own pages and posts as well as any other users’ pages and posts. They can also manage categories, links, comments, see private posts and upload files.
- Administrator – This type of user can manage the site it’s assigned to completely. This includes adding, editing and deleting any pages, posts, comments, plugins, or themes, pushing through updates, and any other management task.
- Super Administrator – This User role is added when Multisite is enabled. A user with this role can manage the entire WordPress Multisite network.
When you create a fresh install of WordPress, you automatically get assigned the Admin user role. When you enable Multisite, you’re automatically upgraded to a super admin role.
Keep in mind that this list is in ascending order, ending in the role with the most capabilities. Each higher-tiered role includes the capabilities of the previous role as well.
How Does WooCommerce Handle User Registrations?
When you install WooCommerce to a WordPress Multisite network, there are additional user roles that are created to help you manage your network of online stores:
- Customer – This user role is essentially the same as a subscriber, except this role also has the capability of placing orders and viewing them after the fact.
- Store manager – This user role has the capabilities of the editor and customer role while also being able to manage all the WooCommerce settings from adding, editing and deleting products to adjusting store options.
Beyond that, the admin and super admin also get the additional functionality detailed below:
- Create, edit and delete products
- View all reporting
- Manage all WooCommerce settings
Keep These Security Concerns in Mind
I would be remiss to mention creating a WooCommerce Multisite new user role without also going over potential security concerns you should carefully consider.
The first potential issue has to do with secure passwords. Be sure everyone uses strong passwords for their accounts, especially if they have some managing capabilities defined in their assigned user role. The admin or super admin can enforce the use of strong passwords in the settings.
It’s also critical to keep passwords private and to store them securely, such as with a trustworthy password manager app.
Be sure to also only give access to your site to those who actually need it. This is especially true for super admin, admin, store manager and the editor user roles. Giving a user too many capabilities means they could potentially make unauthorized changes or break things.
Be sure to carefully assess who needs access. Every now and again, look over your user list and see if you need to delete some unused accounts. This can help prevent hackers from gaining access to these accounts and causing more issues to your site or network.
When you need to add a user, go over what features they need and choose the appropriate user role. When that’s not possible, create a custom user role or edit existing user roles with the steps details below.
How to Create a WooCommerce Multisite New User Role
You can quickly create a new WooCommerce Multisite user role. You can also make as many of them as you need with the help of the free User Role Editor plugin.
It installs like most other plugins in the admin dashboard. It’s also Multisite-compatible which means you can also install it in your super admin dashboard. You can check out the WordPress Handbook’s page on managing plugins as well as our article How to Set Up and Update a WooCommerce Multisite Network for details on how to install this plugin.
Configuring Optional Network Settings
Once the User Role Editor plugin is installed and activated, you can get right into creating a WooCommerce Multisite new user role.
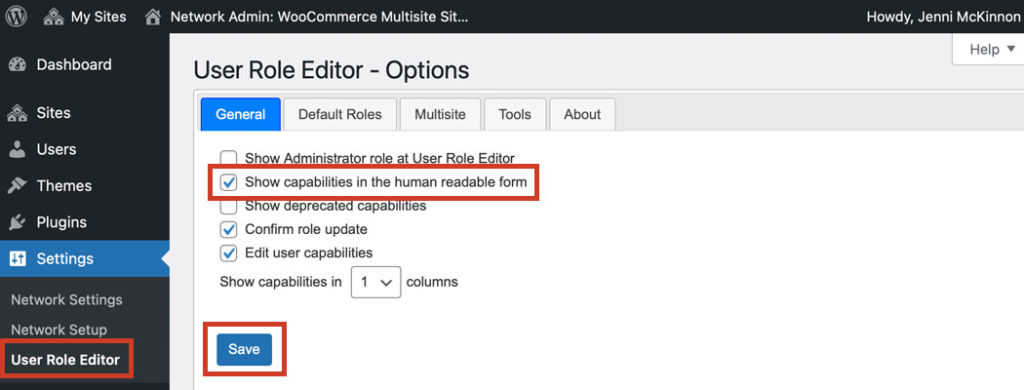
Start by going to your super admin dashboard, then navigate to Settings > User Role Editor.
The default settings are typically okay, but you may want to check the Show capabilities in the human readable form box. Then, click the Save button. That way, you can choose the capabilities you want for your WooCommerce Multisite new user role without seeing developer jargon.
Creating a New User Role
Next, go to the admin dashboard of the site where you want to create a WooCommerce Multisite new user role. Then, go to Users > User Role Editor.
On the right-hand side, click the Add Role button in the list.
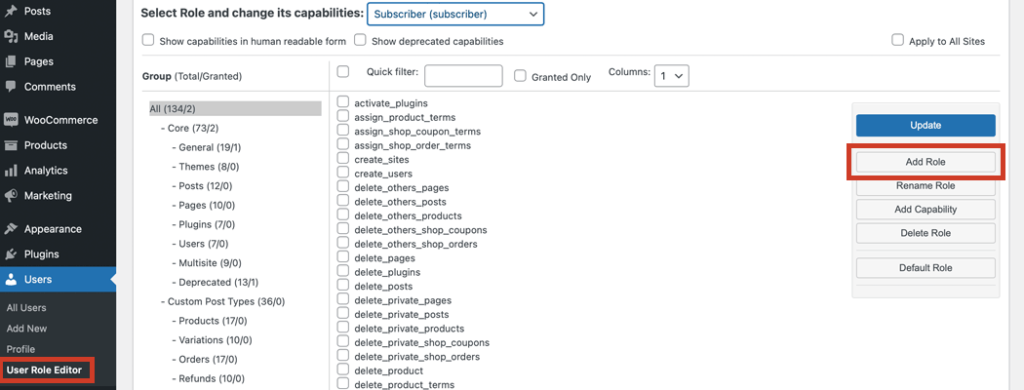
In the pop-over box, enter an ID name for your WooCommerce Multisite new user role. This will be the developer-friendly name so you can type something similar to “multisite_district_manager”.
Then in the next field, type what you want your users to see. Using the same example, you would type something like “District Manager”.
You can then select a pre-existing user role in the drop down box if you want to copy those settings to work off of to save you time. Otherwise, choose None, then click Add Role.
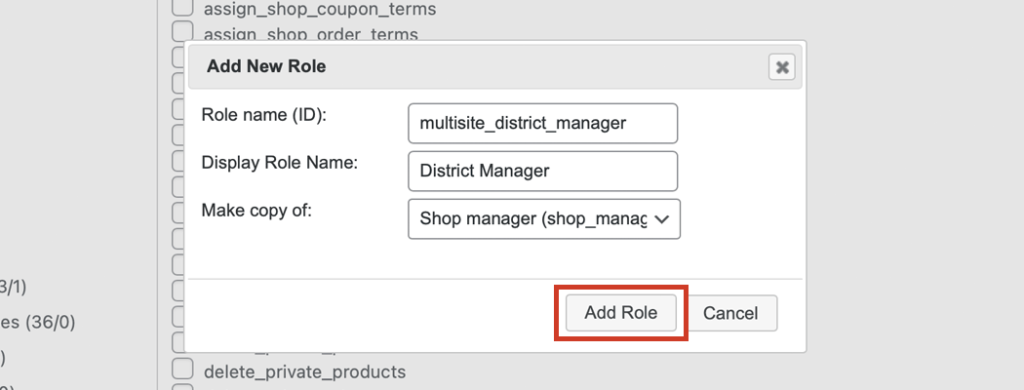
Now, you can select or deselect the capabilities listed, as needed. By default, all the available capabilities are listed, but you can narrow down your options by different categories that you can select in the menu on the left-hand side of the page.
When you’re done selecting the capabilities you need for this user role, save your changes by clicking the Update button on the right.
You’ll be asked to confirm that you want to change the user role. Click Yes.
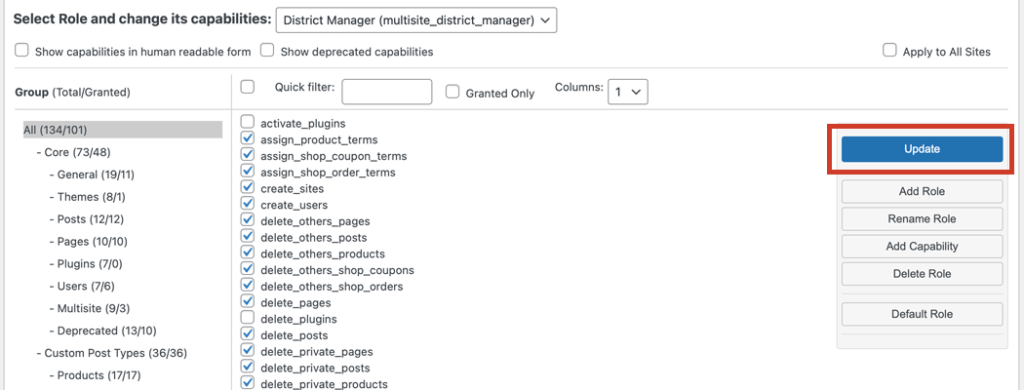
You can repeat these steps to create as many user roles as you need for each site in your network that needs it.
You can also sync users within your network so users can use the same account across multiple sites. For details on that, check out Adding a WordPress Multisite User Sync Feature (with WooCommerce).
Editing or Deleting User Roles
If you need to edit a user role, go back to the admin dashboard of the site where you need to make the changes. Then, go to Users > User Role Editor again.
Select one of the existing roles from the Select Role and change its capabilities drop down box towards the top of the page.
Select the capabilities you need by checking the corresponding boxes. You can also uncheck any of the capabilities you don’t want to include. When you’re done, click Update.
If you’d rather delete a role instead, select it from the drop down list. Instead of editing it, click the Delete Role button towards the right.
Final Thoughts
There are several occasions when adding or editing a user role is the best way to go. Even if you have a WooCommerce Multisite network instead of a single installation of WordPress, you can still easily create user roles with the help of a plugin.
You can also custom code user roles. You can check out Roles and Capabilities for details or you can reach out to us for help, as we’re verified WooCommerce experts.
Do you have any questions? Let us know in the comments.
