Skip to content
When you want to be able to create multiple WordPress sites that all sell subscriptions, a WooCommerce subscriptions Multisite network is what you need.
You’ll be able to manage as many sites as you want, all under one roof. You’ll also be able to sell different types of subscriptions plans for all the sites you want.
Here are more details about selling subscriptions using a WordPress, WooCommerce subscriptions Multisite network and the WooCommerce Subscriptions extension.
Can I Sell Subscriptions on WordPress?
By default, WordPress doesn’t have the functionality to sell subscriptions, but it’s still possible. You can install the WooCommerce plugin and also a subscription plugin. You could also choose to create your own custom solution with code.
If you’d like a custom solution, but you don’t want to touch code, you can hire a verified WooCommerce developer or agency for top-notch results.
Can WooCommerce Handle Subscriptions?
Similar to the above question, WooCommerce alone doesn’t support subscriptions, but you can also use a plugin to make it happen.
There are several great options for subscription extensions. The best one is the one that’s best-suited for your specific needs.
One of the plugins we recommend is the WooCommerce Subscriptions extension.
With this plugin, you can sell these on a recurring subscription:
- Physical products
- Virtual products
- Downloadable products
Once it’s set up, visitors will be able to sign up for a subscription plan and have access to the content you set.
Can I Use WooCommerce Subscriptions on Multiple Sites?
You absolutely can use the WooCommerce Subscriptions extension on multiple sites. But, you can’t do this with a single site license.
You can either purchase a license for multiple sites or you can get a Multisite license. This will let you create a WordPress WooCommerce Multisite network with as many sites as you want. Each of these sites can have subscription-selling capabilities.
Quick Reminder: What is WooCommerce Multisite?
Multisite is a built-in plugin within the WordPress software. When you enable it, you can create virtually unlimited sites using just one database.
If you’re wondering if that will get unwieldy and slow down your sites with all that data being funnelled into one database, not to worry. It won’t impact the performance of any of your sites as long as you maintain them responsibly, which you should ideally be doing, regardless.
One of the best parts about using Multisite for this purpose is that you can have all your sites managed under one main admin dashboard. It speeds up your workflow since you don’t have to log into all your sites every time you want to manage one. You can log in once and have all your sites available at your fingertips.
For details, check out one of our other articles, WordPress Multisite and WooCommerce Multisite: An Overview.
How to Set Up WooCommerce Subscriptions: Multisite Included
Below, you’ll find the steps you need to set up a WooCommerce Multisite network with the WooCommerce Subscriptions plugin. You’ll be able to sell recurring subscriptions on all the sites you want within your network as mentioned above.
1. Getting Started with Basic Set Up
If you haven’t done so yet, create a Multisite and install WooCommerce and the WooCommerce Subscriptions plugin. Be sure to install and activate both plugins on the main site of the network so it’s available to all of your subsites.
You can check out these articles for details: How to Set Up and Update a WooCommerce WordPress Multisite Network, Create a Network, and Managing and Installing Plugins.
If you have a pre-existing Multisite, create a whole network backup. This will ensure you can recover your sites in case something goes awry. Just be sure to back up all your sites’ files as well as the database.
Also, use a staging or local development environment whenever possible.
2. Configure the Subscription Settings
Once that’s done and dusted, it’s time to select the settings you need.
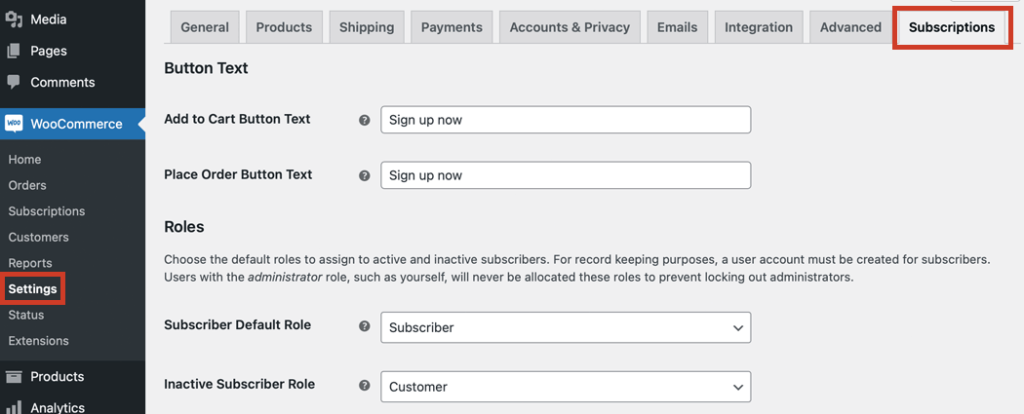
Go to the admin dashboard of one of the sites within your network. Then, go to WooCommerce > Settings and click on the Subscriptions tab. There will be several options you can configure to kick things off.
Button Text and Roles
You can optionally customise the text that’s displayed on add to cart and place order buttons. Under the Roles section, you can set the default user role to use when someone subscribes or successfully places an order. You can also set the role that’s used if a customer has their subscription manually cancelled or else if it has expired.
Miscellaneous Settings
There are also miscellaneous settings that you may need:
- $0 Initial Checkout – When checked, customers can start a subscription without entering a payment method.
- Drip Downloadable Content – You can set downloadable content to be gradually released instead of all at once.
- Customer Suspensions – On annual subscriptions, you can limit how many times a customer can put their account on hold during the billing period.
- Mixed Checkout – When checked, this option lets customers purchase multiple subscriptions that can all be active at the same time.
- Retry Failed Payments – You can retry payment methods if they fail with this box checked.

Renewal, Synchronisation and Switching Options
Beyond that, there are several other options to consider:
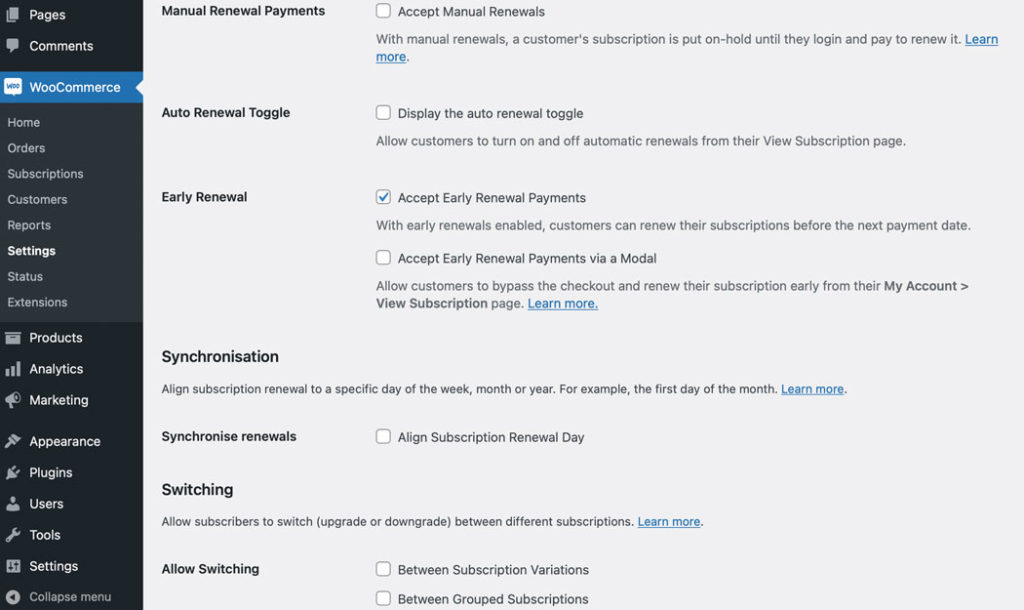
- Manual Renewal Payments – You can set subscriptions to be on hold until they’re renewed manually by the customer.
- Auto Renewal Toggle – Give your customers the option to choose whether they can set their subscription to automatically renew.
- Early Renewal – Let your customers renew their subscriptions early, before their next payment is due. You can also choose to let customers skip the checkout and renew through their account page.
- Synchronise Renewals – Set all renewals to occur on a specific day of the week, month or year, rather than whenever your customers signed up.
- Allow Switching – Give your customers the option to upgrade or downgrade their account.
Once you’re done making your selections, be sure to click the Save Changes button at the bottom of the page.
3. Create a Product for Your Subscription
That’s all well and good, but to actually create your first subscription that customers can purchase, you need to create a product and set it up.
To do this, go to Products > Add New in the admin dashboard of one of your sites. Fill in the details you need such as the product title and description.
To set up a subscription, navigate to the Product data screen element. Choose the Simple subscription option or the Variable subscription drop down item if you want customers to be able to choose specific options for their subscription such as sizing or colours.
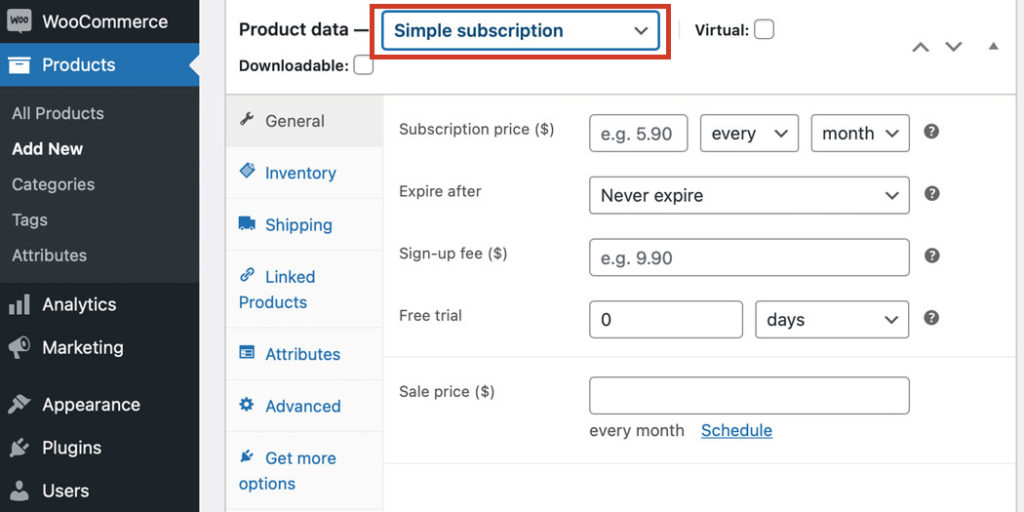
Fill out the details, as needed, then click Publish to finish setting up your first subscription.
For more details on configuring your subscriptions, check out Creating a Subscription Product.
4. Set Up a Payment Gateway
Now that you have a subscription set up, you need to be able to accept payments. Enabling and configuring a payment gateway will do that.
Out of the box, the WooCommerce Subscriptions extension comes with these payment gateways:
- PayPal Standard
- PayPal Reference Transactions via Express Checkout
If you want to be able to sell subscriptions on more than one site in your WooCommerce Multisite network, then you’ll need a different payment gateway such as Stripe.
You can set it up by going to WooCommerce > Settings, then click on the Payments tab.
Setting up Stripe is beyond the scope of this article, but you can check out the Stripe Installation WooCommerce documentation page.
5. Rinse and Repeat for the Rest of Your Network
Once you have your first subscription set up on one of the sites in your network, it’s time to add more. You’ll need to repeat this process for all the sites in your network where you want to sell subscriptions.
When you’re done, be sure to test your subscriptions and back up your whole network again before pushing your changes live.
WooCommerce Subscriptions with Multisite Done and Dusted
You can build a WooCommerce subscriptions Multisite network. If you do, you’ll be able to have multiple sites under one roof. Not only that, but you can set up as many of those sites as you want so they can sell subscriptions to physical, downloadable or virtual products.
If you’re not keen on making this a DIY project, you can hire a developer to help you out. Choosing a verified expert WooCommerce agency (such as yours truly) will ensure all your specific needs are met while providing professional, specialised development.
Feel free to get in touch with us and we can help you out.
Do you have any questions on how to set up a WooCommerce subscriptions Multisite network? Share your thoughts in the comments below.