Skip to content
If you need to create an online marketplace or a network of them for your different brands, you have come to the right place. With a WooCommerce multi vendor network, you could even have users register to create their own marketplaces.
In either case, users can create and sell their own products while you earn a commission.
As verified WooCommerce experts, we get asked about how to do this quite a bit.
It can all be accomplished with WordPress, WooCommerce, the Product Vendors extension, a payment gateway and Multisite if you want to create a network.
Here’s how to build your own WooCommerce multi vendor site and network with these plugins and software.
Getting Started with a WooCommerce Multi Vendor Site or Network
Before cracking right into setting up your own WooCommerce multi vendor marketplace or network, you need to have a WordPress site installed on a web server. You can download a copy on WordPress.org.
Check out the How to Install WordPress in the WordPress.org Handbook for details on how to get this sorted.
Once that’s done, it’s time to enable Multisite, if you want a network of marketplaces. If not, you can skip this step. There are detailed instructions on how to set up Multisite on the Create a Network page in the WordPress handbook.
You can also check out How to Set Up and Update a WooCommerce WordPress Multisite Network since the next step is to install the WooCommerce plugin. Even if you only want to create one marketplace, you’ll still need to install the free WooCommerce plugin.
After that, there’s one more plugin that needs installing: the premium Product Vendors WooCommerce extension.
While there are other options for creating WooCommerce multi vendor marketplaces, as verified WooCommerce experts, this is the plugin we recommend and also use for similar projects.
For details on how to install plugins, check out Managing Plugins.
Next Steps for Creating a WooCommerce Multi Vendor Network
If you’re interested in building a network of marketplaces, then you don’t want to skip these steps. But, if you want to build only one WooCommerce multi vendor marketplace, then you can skip down to the next section.
Once you have uploaded and installed the Product Vendors extension, click the Network Activate button on the next page that comes up.
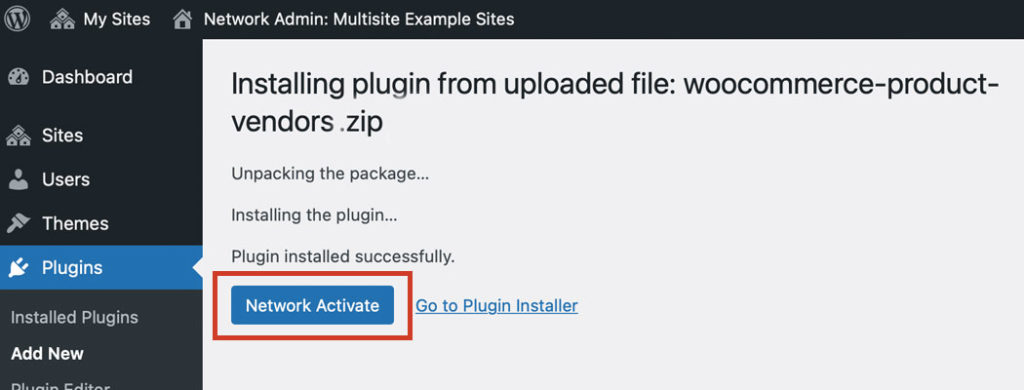
Now, each site in your network can be a marketplace.
Now that your network of WooCommerce multi vendor marketplaces is set up, it’s time to configure each site with the settings you need.
Additional Options for Your Marketplace Network
If you want only some sites in your network to be marketplaces, you can skip the network activation. Instead, you can go to the admin dashboard of each site and enable the plugin on the sites you want as the super admin.
Keep in mind that individual site admins will have access to the plugins page if you first check the Plugins box next to Enable administration menus at the bottom of the Settings > Network Settings page. Don’t forget to click the Save Changes button when you’re done.
If you want to sync your marketplaces, you’ll need additional plugins for that. You can check out these resources for details:
- WooCommerce Multisite Product Sync Options for WordPress Networks
- 3+ Best WooCommerce Multisite Global Cart Options for WordPress
- 4+ Top WooCommerce Multisite Inventory Sync WordPress Plugins
- Adding a WordPress Multisite User Sync Feature (with WooCommerce)
- WooCommerce Multisite Order Sync: How to Add This and More to WordPress
But what if you want to sell subscriptions to users in exchange for letting them register to your network and create their own marketplace? We recommend installing the WooCommerce Subscriptions extension for that.
While that’s beyond the scope of this article, an article on this is in the works.
Enabling Site Registrations
To have users be able to register and create their own marketplace, you’ll need to enable user signups.
In the super admin dashboard, go to Settings > Network Settings and under Registration Settings, choose one of the following options that are best suited to your network:
- User accounts may be registered
- Logged in users may register new sites
- Both sites and user accounts can be registered
Once you have made your selection, click the Save Changes button towards the bottom of the page.
Next Steps for Creating a WooCommerce Marketplace
Now that everything’s set up, it’s time to configure the settings of your WooCommerce multi vendor marketplace.
Getting to Know the New User Roles
It’s important to know the new user roles that have been created during the set up process.
WooCommerce adds two new roles: store owner and shop manager. The former is the owner of the site and has access to manage everything in the store. The latter can edit the users in the marketplace. But, the store owner also has the store manager capabilities.
The Product Vendors extension adds these additional user roles:
- Vendor admin – Users with this role have access to manage all of the extension’s settings.
- Vendor manager – There are fewer capabilities than vendor admins, but users with this role can manage most of the extension’s settings.
- Pending vendor – Users that have registered to sell products in the marketplace, but haven’t been approved or assigned a user role yet.
- Vendor – A registered user that can add products to sell in the marketplace. Vendor managers and admins can access and manage a vendor’s products.
Setting up a Payment Gateway
Now that that’s out of the way, it’s time to set up a payment gateway. PayPal can automatically pay commissions, but you need to have a merchant account to do it.
For businesses in Germany, you’ll need to use a different payment gateway or manually process commission payouts.
For details, check out 10 Best WooCommerce Payment Gateways.
Creating a Registration Form
To have users be able to register accounts to become a vendor, you need to create a registration form with a shortcode.
First, create a new page by going to Pages > Add New in your admin dashboard (and not the network dashboard).
In the WordPress editor, add the following shortcode:
[wcpv_registration]
Add other details, as needed, such as a page title and anything else you want.
Click the Publish button.
It may be important to note that administrators won’t be able to view the registration page. So, if you want to see it, you’ll need to log out first. Or, you can use an uncached browser window or Chrome’s incognito mode, for example.
The Vendor Name field in the sign up form is the name the user wants to use throughout the store. It also must be unique.
You can also manually add vendors by going to Products > Vendors in your site’s admin dashboard. This is also where you’ll see a list of your current vendors.
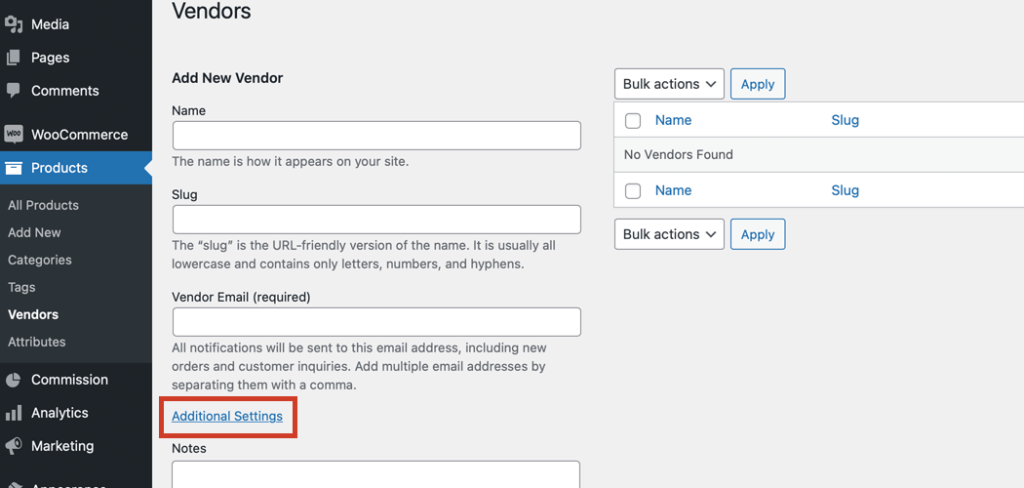
Click the Additional Settings link under the Add New Vendor form to reveal more settings like a vendor logo, notes, commission rate and more.
When you’re done, click the Add New Vendor button to save and add the user.
When You Don’t Want to Hack It on Your Own
Going the DIY route can be a hassle at times. If you’re finding this is the case with you or you’d just prefer to have a professional handle it for you, you can hire a verified WooCommerce expert agency like us.
A WooExpert will listen to your specifications and create the exact marketplace or network you want without the fuss.
Feel free to get in touch with us and we can let you know what we can do to help.
Wrapping Up
Whether you want to set up a single WooCommerce multi vendor marketplace or a network of them, you can make it happen.
With WooCommerce and the Product Vendors extension, you can create a marketplace of your own. When you add Multisite into the mix, that’s how you can create a WooCommerce multi vendor network.
The steps above should set you up right, but if you still have questions, feel free to let us know in the comments below.